
Ok so I originally wrote this blog post FOUR years ago. LOL Time flies. Lately I’ve seen a comeback in patients of mine and friends making their own kombucha so I wanted to put this back up here for you guys to be able to use. This is our favorite recipe for when we made our own kombucha all the time. We don’t make it currently just do to space and time so we drink Buddha’s Brew. But we whole-heartedly recommend and love kombucha and the benefits of it. So here you go…here’s my post:
So what the heck is Kombucha exactly?!?

Kombucha is a living, fermented tea drink that is made by fermenting sweet tea (green/black) with a kombucha “culture”. It’s not totally clear exactly when and where kombucha originated, but records show it being used in China as far back as 221 B.C. They called it the “Tea of Immortality” for it’s healing properties. Japan also has record of using kombucha dating back to 415 A.D. From there, use spread to Russia, Prussia, Poland, Germany and Denmark. It was widely used until World War II and then it really died out. It reappears in history in Germany when used by a Dr. Rudolph Skelnar to treat cancer patients, high blood pressure, and diabetes.
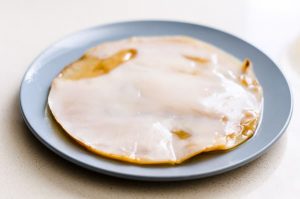
The Kombucha Culture is white and pancake-looking and is often times referred to as a S.C.O.B.Y or Symbiotic Culture of Bacteria and Yeasts. By letting this culture sit in a solution of sweet black or green tea for several days, the culture will convert the sweet tea into a drink filled with probiotics, minerals, and vitamins. The culture also produces many B-vitamins and many acids necessary for cellular repair and communication.
There are many different recipes for kombucha and many commercial companies making their own you can purchase at health food stores and grocery stores like Whole Foods. Companies like Kevita and Synergy are 2 of the many different companies cashing in on this fermented power drink. I’m going to show you guys the process that I have been shown that is working really really well to produce consistently great kombucha that I feel has radically changed my digestive health and energy levels.
Step 1. Pick your Tea
There are different types of tea you can use to brew the kombucha. You can use black tea, Oolong Tea, Green Tea, or White Tea. Any of these teas will work, but for our recipe today, I use Black tea personally. I have brewed it with green tea and never really liked it and stopped. After getting this recipe from one of my patients, I have brewed a minimum of 2 gallons of kombucha per week. So any of the teas is fine, just pick what you will like.
Step 2: Brew up your tea
For this recipe I use 8 bags of black tea per gallon. I do everything is glass for this because I don’t want to contaminate it for one, and the Scoby will eat the plastic on the other if you put it in there. So 8 bags of black tea brewed, then left to cool to room temperature. To sweeten the tea, you need to add 2 cups of sugar per gallon of tea you are going to make. The sugar is what feeds your culture in the brew and allows for the fermentation to happen. I use organic cane sugar for mine. What I’ve found is Sucanat and other more natural sugars don’t work the same.
Step 3 (maybe should be with Step 1): Add your SCOBY
Ok, I realize that in order to add your Scoby and starter kombucha, you must first actually HAVE one. There are several options on this. The first is you can just find someone that you know or maybe people can post on this blog post, who have scobys that they need to separate. They can tear you off a layer and give you some started kombucha to begin your batch and then you will build it up with every single brew that you do. Or you can also go to websites like Kombucha Kamp to order cultures and brew kits to help you get started. Either way is fine, just whatever is available and easiest really. Once you actually have your Scoby, then add it with the 2 cups of reserve kombucha that you have with it to your tea and lay the Scoby on top.
Step 4: Initial Brew
After adding the Scoby to your brewed tea, you want to let this sit on your counter in a glass jar covered with a hand towel like this for 5-7 days. I have brewed every batch of mine at no longer than 5.5 days and it has come out amazing. The longer you brew it for, the stronger it gets and it will start to really taste like vinegar after awhile if you don’t watch it. During this stage you don’t do anything to the mixture but just let it sit there and do its thing!
Step 5: Adding purees and the second fermentation
One of the mistakes I realize that I made with my first few attempts at brewing kombucha was that I didn’t add anything for flavor at all!! We would just drink it straight and it tasted like the worst apple cider vinegar that you’ve ever tasted!! With this recipe though, you will add 1.5 cups of fruit puree to your brew after you have let it sit for between 5-7 days. The puree you choose is up to you. At this point I have tried strawberry, pineapple, and blackberry with our absolute favorite being the blackberry. I would think that most fruits will work, so you’ll just have to try different ones that are in season in your area or that are available. I don’t add anything to the puree, just the fluid and I blend it up in a Vitamix blender until watery. Then I freeze it in mason jars until I’m ready to add it to my brew. Before you add the puree to your kombucha, you need to transfer your Scoby to another dish or jar and add 2 cups of the brewed kombucha back in with the Scoby to keep it alive and keep feeding it until you are ready to brew another batch. Don’t add in the puree with your Scoby in there!!

Step 6: Bottle it up
Once you add your puree, then you need to bottle up your kombucha and leave it out on the counter covered for an additional 3 days for a second ferment. This one is crucial and I believe is the total difference between my first and second attempts at brewing kombucha. You can use small mason jars and put it in there, or the best way is to use swing top bottles. Here is an example of what I’m talking about. Container Store carries this specific type of bottle. I actually bottle mine in swing top beer bottles made by Grolsch, but you can get them cheaper on sites like this. The swing top bottles are the best at keeping in the natural carbonation that occurs during the second ferment and keep it the freshest. So pour your puree and kombucha mixture into the bottles (about 8 bottles per gallon usually) and then close the tops and leave them on the kitchen counter for an additional 3 days. At the end of the 3 days, then put them in the refrigerator and leave them in there to chill for 12 hours. If you don’t leave them this long then it will spew on you really bad when you go to open them!
Step 7: Enjoy your kombucha!!
After it has been in the fridge, then it is ready to drink. I would recommend not drinking a large amount of the kombucha if you have never tried it before because there are so many cultures in the brew that you will possibly give yourself diarrhea.
*Essential Oils: One of the things we enjoy doing with our kombucha after we make it or even if we buy it is to add some citrus oils to our kombucha. We like using Lime or Tangerine Essential Oil from Young living. It adds a fun taste and then you get the benefit of the oil! Try it out!*
Common Questions I’ve heard…..
Q: Is Kombucha alcoholic? At the length of time you are brewing it, your kombucha will contain a trace amount of alcohol. But it is equivalent to 1/2 of 1% of alcohol…about the same you’ll find in orange juice.
Q: Can kids drink this? Absolutely! There is some carbonation in the drink so go slow on it at first. We give it to Harper because of the intense amount of minerals and cultures in it, but know that everything in moderation. We don’t allow him to have more than than a few ounces a day of it.
Q: Does it taste good? I’m probably not the person to ask this to. I eat Sauerkraut out of the jar straight, love all my food cold, and mix all my smoothies and green drinks with water. But I have never given any of our kombucha to anyone who doesn’t love it!! The pure is the secret because it makes it taste like a really really good berry cola or something. Totally refreshing, and tons of energy boost with it.
Q: What are the health benefits? Well, there’s too many for me to blog and re-create the wheel, so go here and check out what they found in kombucha and see what all it can do! Every brew is going to be different since you are using a live culture to do the brewing for you. And times and temperatures and amount of sugar make a difference as well.
Q: Is the carbonation bad for you? Again, like I said above, everything in moderation. Synthetic carbonation like in a soda will cause leaching of minerals out of your bones and muscles in order to try and stabilize the carbonation. The carbonation in kombucha is naturally occurring so is not the same, but your primary liquid should always be water, obviously.
Q: Where does all that sugar go?? The massive amount of sugar that you put into the kombucha to feed your culture is totally eaten away during the fermentation process so there is no sugar left in the drink.
So that’s my “secret” recipe, I hope it works for you as well as it has for our family. Since I’ve been drinking the kombucha I’ve been making, I’ve noticed less joint pain, more energy, more clarity, and much better circulation. Coincidence? Maybe….but I haven’t changed anything else….so….
Just try it out and see what you think, I think you’ll be pleasantly surprised!
Be well!